Showing posts with label distress stains. Show all posts

Sunday, 8 July 2012

Rusty

Oh deary me, it's been a tough couple of weeks on the old health front I have to say - bronchitis in July is not what you expect.  Never mind though we are slowly getting better and we have a few days away soon in Southwold on the east coast to look forward too. A bit of sea air and some Adnams ales will see us right I'm sure.

Speaking of sea this is what I've made slowly this week.  I love the PaperArtsy hotpicks sea themed plates and I've got lots of ideas for using them and this is just one.  

I have to says I struggled with it a bit, made the frame with and the A6 sized card but wasn't sure if they fitted together. So I tried colouring an 8x8 piece of card to put the A6 card (which I really loved) but that didn't really work and ended up in the bin.

Finally went back to the frame and realised what the problem was.  There wasn't enough contrast between the card and the frame and I was looking to get a really rusted wetherworn look to it all - solution? Rusty Hinge Distress Ink (name gives it a way really doesn't it). I used that to go round the edge of the card and finally got contrast!

You can't really see it but the A6 card has a crackle glaze finish in Inky Pool on the bottom and Ice Blue on top.  The fish from the various plates were stamped in grey Stazon which is less "in your face" than black Stazon.  They were coloured in China Blue Distress Stain and a bit of dry brushing in Honeydew and finally that Rusty Hinge Distress Ink.

The shell was stamped in Aquamarine Archival on a calico that had been given a light wash of Ice Blue. I used the Pacific Oysters stamp to add the lines around the edge (just inked up the edges) Little bit of Rusty Hinge around the edges.  Glued onto a piece of Kraft card and the eyelets added.  This was then glued onto the piece of Crunchy waxed paper that had been stapled onto the A6 card. 

I'm really pleased I had the brainwave of the Rusty Hinge because I think it really lifts it and ties in with the Crunchy paper, Kraft card, string and eyelets to give it that left out in the sea air kind of look.

Well it's a major UK sporting afternoon ahead, the tennis wins in our house (even though Silverstone is only 10 miles from us and all we've heard this morning is helicopters going over). I  shall sit and watch it adding some border rows to my granny square crochet blanket - keeps me warm on these chilly summer evenings!

hugs
jo
xx

Sunday, 24 June 2012

Mocha,Chocolate, Butterscotch, Caramel or Hazlenut???

Well things aren't too bad here on the ranch, perhaps that should be prairie as Mr trusty beast of a lawnmower has decided that enough is enough and he doesn't want to play anymore until he's had some TLC and new parts.  This means that the lawn hasn't been mown in a fortnight  and with all the rain its getting so long it's a job to see the cats lying down it!  I know the simple answer is to borrow one but the other half has had man flu all week which has meant he has had to stay in bed or on the sofa nursing and perfecting his cough (I could never be a nurse, no tolerance or sympathy at all).

So a touch of brown eh for Simon Says Stamp and Show?  Well after going on a stash spending trip last weekend with Lin and Karen at the the lovely Stamp Attic I bought more Prima Flowers. 

I know I have a gazillion already, but they just winked at me in that you know you want to buy me way and just I cannot resist.  In the original excessive collection of flowers are some brown ones, so in an effort to actually use some and reduce the size of stash (Chelsea Flower Show has nothing on me in terms of flowers). I though I'd base whatever I made around flowers  - lots of them.

Back to old trusty 8x8 this week and a piece of brown core-dinations card.  I sponged on some Fresco Finish French Roast, sanded that a little bit and then added some Chocolate Pudding through a flower stencil. Some more sanding and then Inka Gold through another stencil to give the tiny gold squares (bit sort of Klimt like if you know what I mean).  Heavier sanding along the edges and finally some swirls in Coffee Archival. 

You can't see most of this, but I know it's there and ~I think it adds texture and depth to the background and more importantly I enjoyed doing it!

I cut some old brown paper with the Vintage Cabinet die and added thin layers watered down French Roast over it.  Embossed it in a swirly folder and added Gathered Twigs Distress Stain over the top to highlight the raised embossing. Finally some text stamp in Picket Fence Distress Stain.

The tag was originally Kraft card which was painted in Chocolate Pudding, some Crackle Glaze over that, a top layer of  Irish Cream and then a watered down wash of French Roast over that.  Some flower stencilling and finally some stamping and embossing (the crackle layer looked superb but you can't see it now as I've covered it up with the stamping and embossing!).

Layered it all up with some corrugated card, ribbon, buttons and of course lots of flowers!

Hugs

jo
xx

Friday, 6 April 2012

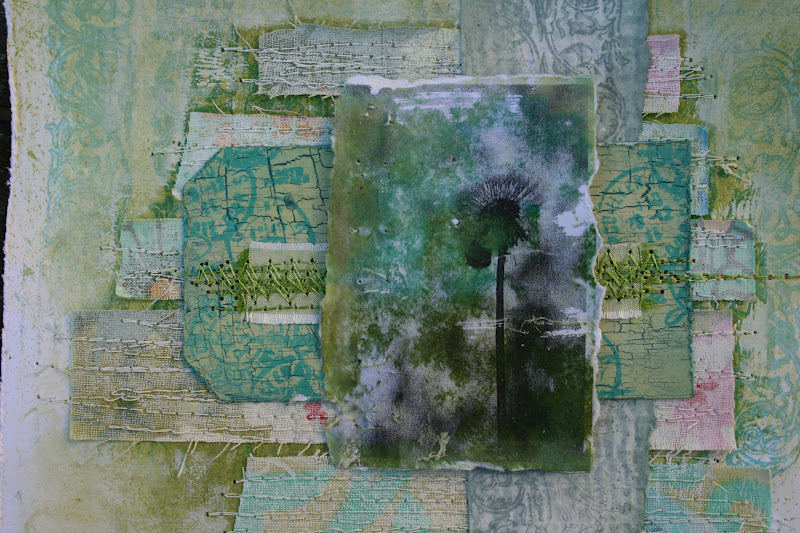
A REAL shabby dandelion

I think I'm beginning to identify my signature style - layers, made up of fabric and paper with stitching stamping and a focal point.  Sometimes that focal point is a strong stamped image sometimes as in this case it is one of my photographs.

I rarely take photos of people, don't like that forced stand in a regimented group, smile and record the event kind of thing.  Very often I'll use a long lens and take a close up without people even realising I'm taking a photo - far more intimate and more natural (no I don't work for a red top comic).

But my greatest love with photography is close ups of flowers (and stone walls and moss and wood and rusted metal if I'm honest). Before the days of digital cameras I would go through rolls and rolls of film on holiday or day trips to National Trust gardens and my poor husband would become a photographers assistant as I changed film or lenses.

With my photographs sometimes I don't want a clear image, sometimes I want it all aged or faded or roughed up (there's that style thing again), that's why I love Instagram as it has all those delicious filters you can lay over an image.  In this case I did some image transfer using gel medium.  I printed my photos on ordinary white paper and photocopied them.  Spread a thickish layer of gel medium on card and put the image face down on that and made sure it was well adhered.  Let it dry (overnight is best), wet the image and gently rub off the photocopy paper and you get a roughed up image because the image doesn't stick all over and you get odd bits of white space. Love it.

You can of course use black and white images like I did here or colour ones.  But in both you can further colour as you have paper as the base layer not glossy photo paper.  For this one I used Peeled Paint and Broken China Distress Inks over the top - literally just rubbed the ink pad over the image and used a baby wipe just to move it around a bit and soften the edges.

The 8x8 base layer had Peeled Paint and Shabby Shutters Distress Ink with Lettuce ColourWash added.  The stamping using PaperArtsy stamps was done in Aquamarine Archival (love this teal blue colour) 

Once the fabric strips were sewn on I went over them with gesso (rolled on so it wasn't too heavy)  to tone down the brightness. Rubbed back the gesso with a baby wipe where it had gone over the stamped images.  

The scrap of card was inked with Weathered Wood Distress Stain, embossed using a  brick effect folder and then White Picket Fence Distress Stain over that.  Stamped in  Iced Spruce Distress Ink, torn edge and inked with Iced Spruce as well.

The tag was painted in Baltic Blue Fresco Finish, a layer of PaperArtsy Crackle Glaze and then a mixture of Inky Pool and Guacamole Fresco Finish over that. Stamped in Broken china and Aquamarine.  A strip of lime green silk and some metallic line green thread stitching to anchor it all both physically and visually. 

I like it and it makes me happy to make and look at, but the question is would other people like and more importantly do you think they would spend money on buying something like this???? I ask because what I'd really like to do is make art with my photographs and sell on Etsy.  That would be  big step for me in terms of confidence but doing this blog has helped me  "get out there" and feel more confident in my abilities creatively.

Right enough of the self analysis and time for a fortifying breakfast, it is Good Friday which means in our house - tidying the veg patch ready for planting!

hugs

jo
xx


Tuesday, 3 April 2012

Works outing

I kid you not this has taken me over two weeks to finish, it was supposed to be an entry in a challenge (Sunday Stamper - misting) but "missed" the deadline!

8x8 blue card stock with some Beach Hut Fresco Finish painted then sprayed in various green inks including some shimmery ones.  On the right had edge I sprayed some blue inks but they were just too heavy, so rummaged in the fibres box and found some white and blue silk weavers waste so sewed that on with some blue/ green shimmery ribbon.  

The bottles from this PaperArtsy plate were repeatedly stamped using Aquamarine Archival.

The tag was painted in Ice Blue and Beach Hut Fresco Finish paint and the circles were added using denim colourwash spray. Our esteemed  gentleman from this PaperArtsy plate were stamped in Ultramarine Archival. edges distressed and Walnut ink round the edges.

That's how it stayed until this morning when I added the felt, green ribbon and buttons  and added some splodges of Bundled Sage Distress Stain.

So why works outing as a title?  

Well I went out on a sort of works outing on Friday night ( a rugby do) with a lot of smartly dressed gentlemen and the number of bottles on our table at the end of the evening sort of matched the background to this.  Needless to say I could have also called it "Never Again" if you get my drift or the "East Maudsley Temperance Society Annual Outing"

hugs
jo
xx

Saturday, 24 March 2012

This is the happy house

Wow, WOYWW certainly got quite a few people coming to look at little old me and my creations - thank you everyone who commented.

So what was on my work desk was this, yet another mixed media creation inspired by a fabric house Gabrielle and I saw last Saturday in a lovely quirky coffee shop.  I hadn't used this plate much from PaperArtsy yet and as it has a house on it, decision made!

I've had these scraps of fabric lying on the sofa in my craft room for ages (off cuts from the strippy quilt that still hasn't been sewn up - sigh) and I knew I wanted to use them randomly sewn on a background.

The canvas is one I've had knocking around for ages, it's had so many layers of paint and stuff on it a few more wouldn't hurt! Gessoed it and then added some sand acrylic and Victorian Velvet Distress Stain in  a shabby splodgy way.
 
The calico layer had some sand acrylic paint as well and then I stamped some text in coffee Archival, used the holes stencil from Crafters Workshop with some Antique Linen Distress Stain.  stamped the butterfly in Pale Ochre Archival and added some Cosmic Shimmer powders (green and pink) in places to make the background.

The fabric offcuts (all in pale pink, off white) were sewn on using pink variegated thread and then I rolled some gesso over the top just to flatten out the different pattern, rubbed some of the gesso back to let bits of the fabric show through. Overstamped this with the chines script stamp from the plate in maroon Archival.

The house was stamped on some thick paper and coloured with oil pastels.  Some White Picket Fence Distress Stain was put over the top just tone it down, the edges were scuffed up and then it was stuck onto some other rougher calico that was sewed onto some white felt to give a bit of padding, some weight and height but still keep the "fabricness" of the piece.

To finish off odd bits of fabric sewn on, a chipboard border from Artist Trading Post which had a little bit of Picket Fence Distress Stain on it and a fabric flower from PaperArtsy with some Victorian Velvet and Picket Fence Distress Stain added. 

It took me ages to finally finish off this piece in terms of the embellishments, I was really happy with the chipboard but it needed something else. I tried loads of buttons scattered about, no not quite right. The flower in it's white state, um sort of but it detracted from the house.  It lay on my desk for a couple of night and then this morning - yes of course the flower works it just needs toning down! 


It's a lovely sunny morning here in the Shires so i was able to take some photo's OUTSIDE, I know how fantastic!


hugs


jo
xx
   

Monday, 6 February 2012

February - late already!

So much for keeping on track with Kate's calendar challenge, it's already Day 6 and I'm only just posting and I didn't manage to fill in last month's - must try harder!

Anyways February, did you know the word February derives from the Latin for purgation (februum) and is traditionally the month for purification. To the Anglo Saxons it was Solmonath or mud month and February 2nd is Imbolc the first day of spring in the Celtic calendar and also Candlemas Day.  

All facts bought to you courtesy of Brewers Dictionary of Phrase and Fable, a classic reference text in any library worth it's salt - meaning worth ones pay from the roman tradition of paying soldiers with salt - a highly valued expensive commodity hence salary (I'll stop now before I bore you to death with any more of my amazing facts). 

Of course something also happens on the 14th which often dictates crafting themes this month. I decided that I'd go with the colour (a bit) but not the symbol!

Started off with two 12x12 card stock that had a pinky base. I  painted on Very Berry Fresco Finish paint very roughly and then dry brushed some Claret over that. Stuck the big swirl mask from Tim Holtz on top and went over with some Sherbet Fresco Finish, didn't quite like the effect so added a bit more Sherbet down the page to cover it up a bit, I liked it now!

Misted over Black Cherry Glimmer Mist, some areas heavier than others.

Using a circle stencil added some circles in Victorian Velvet Distress Stain and circled those with a fine liner. Also added some Dusty Concord Distress Stain circles as well.

I have a fab largish wooden stamp with text and a pomegranate design that I used all over the card stock stamping in maroon Archival ink. Also added some large swirls in black Archival. 

Each day is cut from white card painted with Sherbet Fresco Finish, with a light spray of Black Cherry Glimmer mist and inked round the edges in Walnut Stain Distress Ink. The days of the week were printed on the computer (I haven't added a month label yet as I can't decide whether to stamp or print!)

The winged ladies were a necessity to cover up some mistakes in sticking, text paper with Victorian Velvet Distress Stain and then a gorgeous PaperArtsy stamp in black Archival, edges in Walnut Distress Stain. (I really like how the ladies have turned out and I have one left over which I'll use on an 8x8 scrapbook page that follows a similar layout to this - with some black stitching of course).

Finally added some Tim Holtz butterflies in maroon Archival and some splats of Brick Red Distress Stain.

The photo's aren't fantastic I'm afraid as I did them last night, I had hoped to do them again when i got in tonight as it was still light driving home but didn't make it back in time, 10 minutes earlier (I blame learner drivers and an ambulance) and I might have been ok!

Till next time,


hugs


jo
xx

Thursday, 12 January 2012

Tiiiiiiiiiiiiiiiiiiiiime is on my side (yes it is)

Time, I've had quite a lot of it since late December, what with the Christmas and New Year break and then the first couple of weeks in January on jury service (interesting, very interesting).  But to be honest I'm beginning to go a bit stir crazy stuck at home and I'm actually looking forward to going back to work (I'll change my tune approximately Wednesday or Thursday next week).

Hels Sunday Stamper challenge this week is Time, so "time" to get all the clock stamps out!  

I started with an A4 canvas board and painted PaperArtsy Fresco paint in chocolate pudding all over. Added a layer of PaperArtsy crackle paint and then topped that with some watered down white acrylic with a small spot of Fresco Haystack to give a creamy top coat. Rubbed back the edges of the board to expose some of the brown.

Added some Walnut Distress Stain over the top in places and added some streaks of Fresco London Bus with a small smidgen of Eggplant mixed in to take the brightness down a bit.

Then I started stamping, I used a Brown Timber Stazon to stamp the tape measure (Clock plates 5 from PaperArtsy) and Cherry Red Stazon to do the watches stamp (Clocks plate 4 from PaperArtsy).  Some of the watches had Fired Brick Distress Embossing Powder on top to add a bit of texture.

The tag had Distress Stain in Burlap, Weathered Wood, Picket Fence, I then stamped the square collage stamp from Clocks Plate 2 in Coffee Archival. 

Over the top of that I added some Fired Brick Distress Stain and then stamped random clocks from all the clock plates in Cherry Red Stazon.  Edged in Walnut stain Distress Ink.

Cut the Weathered Clock form two layers of Grunge Paper and inked over with Black Soot and Fired Brick Distress Stain. Stuck it on top of a circle of acetate old packaging and added the hands.

I love my flying clocks!  Wings cut from old book text using the Heart Wings die, the Rosettes were cut from a sheet of Lost and Found and a clock face added on top made from card inked in Burlap, Fired Brick and Picket Fence with lots of water flicked on. 

So once I made all the elements I needed to stick them down, I wanted some height and I was layering certain elements so I knew I'd be using the glue gun. All was going well until I dropped once of the flying clocks and got hot glue all over my fingers.

Ouch, ouch, lots of screaming and shouting, plunge hands in cold water, ouch.  It is fair to say, it really REALLY hurt. 

So this morning I had a little trip to A&E as the large burn on my finger was still weeping.  The nice nurse dressed it for me and I've now got to check whether I need a tetanus booster (yuck).  Was worth it though as I really like what I created.

I carry my craft battle wounds with pride, I just need to be less clumsy when using the hot glue gun. :)

hugs

jo

Sunday, 23 October 2011

Ten minutes!!!!!!!

Ten minutes to make a complete "something" with Tim Holtz products is this week's challenge from Grungy Monday.  Hum, it normally takes me ten minutes to decide on whether to use stains or inks, but a challenge is a challenge.

So taking the advice of Gabrielle I planned ahead.  Selected a set of stamps - mini classics, which sort of dictated the colour scheme (red white and blue) as the stamps have a french theme.

To the pile I added an off cut of white card, a page of text, two tags cut from Tim dies (I always have some knocking around on my desk ready for inspiration to strike), some background paper, embossing ink and black embossing powder, trusty inks and stains in appropriate colours and set the timer.


  1. First cut the base card to 8x8" and then the next layer of old Basic Grey paper a little smaller.  
  2. Die cut the white card with a PaperArtsy die and stamped the postcard card image all over on an angle in Tea Dye Distress Stain. Edged in walnut stain.
  3. Spread some Picket Fence distress Stain on the large manila tag and all over the smaller one.
  4. Added Faded Blue Jeans Distress stain to the large manila tag
  5. Swiped Barn Door Red Distress Stain to the smaller one.
  6. Swiped some Walnut Stain Distress Ink down the book text
  7. Stamped and embossed the Eiffel Tower over the blue and the Mona Lisa on the red
  8. Stuck the white postcard down on the Basic Grey paper, put the text on top of that and stapled the tag to that.
  9. Stuck the Basic Grey down on the base card
  10. Stuck the little tag with some foam pads on top of the big manila tag

Phew!

If I had time I would have quite liked to added in some journalling / title along the lines of - "So when are you going to take me????"  My dear husband who has conversational french classes every week for the past 5 years keeps promising to take me to Paris so he can practice his french and I can delight the art, architecture, pretending I'm Amelie or Meg Ryan.  

It hasn't happened yet either acting or rugby gets in the way (that's the excuses).  anyway my birthday is on a Saturday next year with no excuses of sport or thespianism (I might have just made that word up) on the horizon so I think we might manage it especially if I waft this under his nose enough times!

Hugs 
jo
xx
And no it doesn't mean I was rooting for France in the Rugby World Cup!

Sunday, 16 October 2011

Spooky? Not really

Grungy Monday has returned and the them this week is .... Halloween.  

Halloween - the majority of the UK just doesn't really get it. Perhaps the pagan undertones are just too scary for us! But too be honest when it's teenage kids roaming the streets in Scream masks menacing you for money and causing criminal damage to your property when you don't cough up; so that you are forced to either go out or sit in your own house in the dark in fear of a knock on the door, it seems very removed from the cute candy dress up we see over the pond (phew that was a long sentence - apologies).

So going back to the pagan undertones of the dead walking, of the macabre, the spooky and the downright spine chilling who else does it better than Edgar Allan Poe, so in homage, I give you Raven.

Having acquired the new autumn palette of colours from Mr Holtz (not personally of course, courtesy of Karen at LB) I decided I'd use those on a tag.

Put some of the Ripe Persimmon (orange) on my craft sheet, spritzed with some water and  smooshed the tag through it a couple of times drying in between.  Then with a blending tool I added Seedless Preserve (purple) in the spaces where the orange hadn't stained. Stained a piece of text with Barn Door Red and stuck that down the edge of the tag and dragged a white paint dabber down it to give a bit of streaking.
 
Then with a craftworks stencil I added Gathered Twigs (brown) towards the bottom and up the side. Finally using black archival I added in some stamped images from Mini Ornaments plate.

The Raven himself was cut from a PaperArtsy die and coloured with Black Soot Distress Stain and Violet Glimmer Mist.  He sits on a torn, inked and scrunched up bit of spare card attached with a staples. 

Mind you Mr Raven might not be Mr Poe's but rather Arabel's Mortimer - still miserable and naughty but perhaps not as scary! 

hugs
jo
xx
 

P.S Joan Aiken has to be one of my all time favourite children's authors, her fantasy novels especially the short stories about Mark and Harriet Armitage and the strange things that happened to them as if they were natural everyday occurences.  Perhaps I'll revisit on the sofa with a cup of tea and some jaffa cakes!


Tuesday, 11 October 2011

Get out of jail!

I'm taking a day's annual leave today - why?  Just because I can - aren't I the rebel!

I've had a lovely morning so far and I intend to spend the rest of the day crafting (a little bit of housework just to keep things ticking over of course). But I thought I'd show you the birthday card I made for my oh so fantastic niece who was 17 at the weekend.

I started off with a piece of white card which I embossed in pink with a Tim typeface letters stamp all the way down the card.  When that was dry I went over the top of it with a Black Soot Distress Stain which really set off the pink letters and made them pop!

The Tim butterflies were stamped and embossed in black on old piece of background paper I'd made ages ago with Fired Brick and Barn Door Distress Inks.  The card was originally a parchment colour and a linen effect. 

Distressed the edges with my trusty tonic tool and added some Black Soot Distress Ink round the edges. Used foam pads to mount it on top of the pink letters and voila - one grungy goth emo card (I know I know I am mixing my genres but figured only craft types would be reading not grunge, emo or goths!) 

So just a quick post now I'm off to the craft room to have some fun - I may blog later!

hugs

jo
xx

Sunday, 2 October 2011

Pride, honour and egg shaped balls

Challenge over Simon Says Stamp and Show is - men only this week.  No it doesn't mean only men can enter ( I do occasionally let my husband near my craft room - usually to make my birthday card) but that we create something which is a a bit bloke orientated.

So on my desk for a few weeks I've had this inked up rugby image ready and waiting for me to do something else with it.  As you know (if your are that way inclined) the Rugby World Cup is on a the moment in New Zealand.   Rugby is also quite a "big thing in our household", we have season tickets for Northampton Saints and go to every home game and away games - especially long distance like Ireland Wales or Scotland.  So far this season we aren't doing quite as well as we did last season (finalists in the European Heineken Cup) but as we have so many squad players in the World Cup team we are hoping this is a short term blip and perhaps this year is a consolidation year for our newly revamped bigger squad.

Ok sport talk out of the way and back to crafting!

I've had the rugby team stamp for ages from PaperArtsy (fellow rugby fanatics), it so reminds me of a picture of my Grandad from the 1930's in a similar pose with his team (must find that and scrapbook it). I also really love the shabby chic look that you often see Union Jacks or the St George's cross in graffiti style high end expensive art, so thought I'd combine.

Started off with some card that I painted in a light grey acrylic and Pumice Stone Distress Stain. Then using Fired Brick and Bard Door Distress Stains I "painted" a St Georges cross across the card.  Finally stamped the boys in black stazon.

I sewed round the edge of the card in grey thread quite a few times and then distressed it some more with walnut stain ink and heirloom gold perfect pearls spray.  Also smooshed the edges across my craft mat where excess ink and water were as well.

The large tag underneath is an old manila folder  (I have loads knocking around now after we tidied up the study last week). I stamped a Tim ledger stamp at the top and then stamped again down the card using a large post it note to mask off the top bit and just gt the lines. Stamped the numbers in grey stazon (first and second stamping to get the faded look) and inked with walnut ink.  

The background is part of a new project for me.  I make so much stuff (according to my husband) that I'm running out of space to display it, plus I really wanted to get back into using my photographs in my art.  So i thought why not revisit where you started and scrapbooks!  So I've dug out an old 8x8 scrapbook album.  I like the idea of working in this size, tags will sit nicely on this size page and still leave lots of white space which I like.

So cut a piece of 8x8 card and trimmed down a bit.  Using Frayed Burlap and Fired Brick Distress Stains I just painted some colour on and used a baby wipe to move it a round a bit and soften the edges.  Flicked loads of water on from the palm of my hand to get big water stains.   I stamped the pen nibs in black stazon and distressed the edge.  Attached the tag to the background and them stamped three lions down the left hand edge. Finally grounded it all by sticking it all to an 8x8 piece of light brown card.

From something that was sat on my desk for a while with that I like it but what next question mark hanging over it, this has turned out rather nice, grungy and some might say messy (I appreciate that the grungy look isn't every ones cup of tea) but it suits me.

Well I'm feeling much better than I did yesterday, so more crafting, necessary housework and possibly some gardening!

hugs

jo
xx

Saturday, 1 October 2011

Have a back up plan

It is fair to say I have felt better than I do at the moment.  

It looks as though myself and most of my team have picked up freshers lurgy because yesterday and today I feel absolutely rubbish, I even don't really want to eat so I know I'm ill. 

Freshers for those of you not in or have been in the UK Higher Education system is induction week for all the new first years starting their degree courses - lots of new germs floating around and it looks as though we've picked them up.

I always say to my team have a back up plan for just in case anything goes wrong when you are teaching - usually that's a technology failure and you have to resort to handouts or even the whiteboard to demonstrate what you are trying to do.
So it's a good job I do what I say and had a tag already made that fitted this weeks Sunday Stamper Challenge - resist. It's not cheating, but good planning!

Stamped the lovely swirly flowery stamp in white embossing powder on the bottom of the tag and then used Weathered Wood and Faded Jeans Distress inks to go over the top. Used a dotty stamp on the top half of the tag in Weathered Wood. 

Used the Paper Rosette and Mini Rosette dies to cut out the flowers, sprayed with a antique gold glimmer spray and added some buttons on top.
Ok a very short post for now, I'm off to put some shorts on and sit out in the garden feeling consumptive in this glorious heat - you do know Mr Weatherman it's October 1st today and I live in the UK don't you?

hugs

jo
xx

Sunday, 25 September 2011

ATC's aren't easy!

The Simon Says Stamp and Show challenge this week was to make an ATC - how hard can that be?

Hard.

I did have a grand idea involving a box canvas, linen, four ATC's inks and Tim Holtz stamps, which I started and then stopped (I will return to it- never fear 'co I think it's going to be good) and instead raided the um pile (unfinished projects) for stuff to make a quick ATC.

The ATC had been cut from some mount board and covered in a scrap of Tim Lost and Found, some white paint added, then Fired Brick Distress Stain over the top and a swirly stamp from Mini Classics plate stamped in grey stazon.   I did sand it a bit and some of the paper rubbed off, but that was ok - added to the shabby charm!  The edge was inked with Chipped Sapphire Distress Ink.

The house was a spare one cut from the Artful Dwellings die for the Home Sweet Home project .  I added some Antique Linen Distress Stain and stamped the Eiffel Tower stamp from Mini classics in grey stazon.  The metal roof was a spare bit of metal with some grey paint added and ribbed back to expose some silver. Again some Chipped Sapphire Distress Stain round the edge.

The bird was a spare one from the tweet tweet project, so it had already been stamped with Papillion background stamp. I edged in Chipped Sapphire just to give some definition.

The little hanging bracket is a book ring coloured with Slate alcohol ink.  The inspiration for this is Gillian - so thanks Gillian for the idea.

So considering in the end this was a very quick make made up of odds and ends on the um pile I quite like it, especially the colour combo, Fired Brick and Chipped Sapphire - rather delish and shabby!

Right that big idea is calling (plus others), but I really should do the massive pile of ironing that is engulfing the dining room table at the moment - sigh.

hugs

jo
xx


Thursday, 22 September 2011

Catch a falling star ....

First of all a very big thank you to all of you who left comments on my last post and especially to Hels who gave a big shout out on her blog to come and check me out - I did wonder why I had so many hits on my post and then I found out why!  All your thoughts and best wishes much appreciated blog friends and apologies if I made you sniffle!

Had to raid the Christmas stamp box to find a star stamp for this weeks Sunday Stamper Challenge.  Now I know some of you are already thinking about Christmas but I just refuse too - way, way too early and anyway haven't got any Chrimbo mojo!

So having found said star stamp I decided to make a good old trusty tag, it's nice to be confined by the limited space and therefore you can't spend too much time faffing around on it (well you can obviously but I decided I wouldn't - ha!)
First of all a layer of Weathered Wood distress stain all over the tag followed by Black Soot distress stain.  This was a mistake I thought I'd picked up Weathered Wood again for a second coat!  A quick wipe back with a baby wipe and I quite liked the inky blue darkness with a hint of cream peaking through! Edged in Chipped Sapphire distress ink and a little bit of silver inka along the edge.

Stamped that swirl of stars in clear embossing ink and then used a plumy purple embossing powder over that.

The hanging stars are grungepaper that had Black Soot distress stain all over followed by lots of sprays of a plum glimmer mist and then dazzling diamonds glimmer mist. The star stamp was the freebie in a recent Craft Stamper (this month, last month I can't remember, the pile of magazines by my bed gets bigger and bigger every month!). Stamped in black embossing powder and cut out. 

Two eyelets at the top with a thin bit of black ribbon threaded through and tied into a bow, each star was attached with a tiny staple and button added on top.  The third star was glued to the bottom and spare bit of grunge paper was stamped with catch a falling ...

And yes I didn't spend too much time faffing around - love that word! 


hugs


jo
xx


Saturday, 17 September 2011

This should have been soooo easy

Ah steampunk, what a theme.  it must have been the gods smiling down on me to select such a challenge in this weeks Simon Say Stamp and Show. I mean what more justification can you have for purchasing some of the latest PaperArtsy hotpicks?

Well yes the gods may have been smiling but it was that manic ha ha we are going to take your inspiration away and now let's see how you get on (I'm sort of thinking Greek legend kind of scenario ethereal , white togas and lightening bolts - you know what I mean).  On my goodness - what a challenge it was.
It's taken me all week and it's nearly gone in the bin twice, but this morning I rolled up my sleeves and decided I would crack it.  

To be honest I'm not sure I did - what do you think?

Frame - painted in a dark navy paint and then a lightish grey with some pearl glaze mixed in over the top of some crackle glaze.  Waited for it to dry and then sanded back to distress.  A cogs stamp from Paper Artsy in black stazon all over and finally some walnut stain and distress ink on the edges.

Middle - this is where it got painful.  I first started off with some grey metal embossed in a cogs folder, die cut a clock face and distressed and this was going to go over the top with this gentleman and these birds on top. as you can see only the gentleman and birds remained!

So this morning I started again, glued a page from an old book onto some card, covered with some Antique Linen and Crushed Olive distress stain and then some picket fence. Added various background stamps of Paper Artsy splodges, coffee stains and clocks.

Using a piece of Tim paper I inked with brushed corduroy stain , sprinkled on some walnut stain distress powder, flicked and rubbed of some of it and then heated.  

Once it was cool, gave it another rub over and added some dried marigold stain on top of that.  Ran it through the cogs die, added some bits of ideology and glued everything down with my glue gun.
I'm not sure it's what I was trying to achieve and I'm not sure it's really steampunk, I think it needs much more metal and sprockets and springs to give it more of a  "clanky victorian look" and I think I wanted to make something 3D that suggested movement like a lady dancing in a jewel box (am I talking gibberish - do tell me and I'll stop).

Right that's it I've spent far too long agonising over it  - time to move on to the next challenge: is it going to rain again today and what do I wear to the rugby?

hugs

jo
xx

Sunday, 28 August 2011

Last train ...

The theme for this week at Simon Says Stamp and Show was travel.  

Sometimes for me the journey is just if not more exciting than the actual destination, seeing new sights and sounds on the way and I adore train travel especially the architecture of old Victorian stations and the views from the window as you trundle by.  We had a fantastic trip last year for a rugby weekend in Edinburgh on a chartered train from Northampton - it was just like the Hogwarts Express, 1970's carriages, old BR logos everywhere especially in the loo!. The train also reminded me of my childhood when my Mum used to take all three of us (me and my two brothers) down to London and we'd have to travel in the Guards van as we were in a old fashioned side by side double pushchair - happy days!

So you can see travel and especially train travel is a big thing for me. I really wanted to use some of my photographs that I took on the Swanage Steam Railway a couple of years ago on a holiday to Dorset. We got on at Corfe Castle (very Enid Blyton Famous Five / Kirrin Castle) and went all the way to Swanage (the train station is slap bang in the middle of the town and you can walk down to the sea for a paddle - bliss!).  Along the way at the various stops were little vignettes of days gone by in terms of signs and in this case luggage.

I covered a 10x8 canvas board in old paper (ripped and torn into various strips), gessoed over the top and then lightly washed some cream and brown acrylic over the top and added Victorian Velvet distress ink over that.  Stamped loads of travel type stamps in pumice and slate and then stamped those again in sepia archival. Some of the Tim postcard stamps were added in vintage photo distress embossing powder.
I printed out two of my photo's one of the luggage and one of the train going round a corner in sepia.  I then put antique linen distress stain over the top. Sanded the top lightly to remove some of the ink, distressed the edges and added some walnut stain.  I  used an old credit card to add some white lines as well.

The postcard was inked in antique linen distress stain. The postcard stamp was stamped in sepia archival and then the text and postage stamp in black. Walnut stain added round the edges and in the middle to give that aged look.

Various Tim travel related ticket and location stamps were used to create the rest of the layers all using antique linen, walnut distress inks and stains to make the backgrounds and coffee, black or sepia archival ink to stamp.

Finally glued everything down with trusty glue gun and misted some latte glimmer mist over the top for some additional spotting and ageing.

Really like this one and it goes rather well with my Ration Book piece colour wise and theme so I think I'll try and find somewhere in the house to put these together. So hopefully I've the challenge done in time hence the title - last train ...

Well it's August Bank Holiday weekend here in England so of course it's rained, I put some washing out first thing , bought it back in half an hour later  as it looked like it was going to rain (it did) and now it's back out on the line! Plus we are supposed to be going for a BBQ this afternoon - waterproofs at the ready!

hugs

jo
xx

Wednesday, 17 August 2011

Distressed at lack of distress!

So Grungy Monday this week was to use Tim Holtz distress stickles. Going to my stash box of stickles, metallic paint, perfect pearls etc (I suppose I should call it the glitzy box)  I was somewhat dismayed to find only 2 (yes only 2) distress stickles: pine needles and rock candy. 

To add to the distress and panic,  my local Hobbycraft is closed for the week for a refit, so I couldn't even go for a quick stash dash (try saying that after a few too many vodkas)!
Anyway a few deep breaths saw me calm down a bit and focus on the task in hand.

I've had the weathered clock die for ahem "a few weeks" and I haven't got round to using it along with an associated embossing folder, so a clock tag it was and as I was limited to basically green that pretty much dictated the colour scheme.

I cut the clock from white card, put on some peeled paint distress stain and added some pine needles and vintage photo distress ink. Added some daubs of pine needles distress stickles, not all over just in some places to look,  distressed and well you know - weathered!

Whilst that was drying I started work on the tag.  I used rusty hinge distress stain all over and then added some spiced marmalade distress ink in places  I then ran the tag through the clocks embossing folder and added some pine needles and vintage photo to highlight the embossed bits.  

It was a bit too bright for me, so I swiped a white paint dabber over in places and rubbed back almost immediately to remove the excess and tone down the colour. Finally added some rock candy distress stickles on some of the raised areas for a bit more sparkle.

By this time the clock face was dry so I glued that down where I wanted it, cut off the excess and stuck the remaining bit at the top (waste not want not!).  Stamped the PaperArtsy hours, minutes, second and attached to the bottom of the tag with the mini staples
It was looking good at this stage but I thought it needed just a little something else on the right hand side to fill in the gap.  So out again with the the clock from the PaperArtsy Clocks 4 plate. (a quick look on the PaperArtsy site reminds me that there are other clock plates I don't have and rather like ....) 

I cut a circle from card, painted all over with snowflake PaperArtsy fresco paint, added distress stains and inks in pumice, rusty hinge and stamped the clock face in grey stazon and clear embossing powder. Daubed a bit more rock candy distress stickles over the top - panicked as it moved the ink around and then left it to dry.  Stuck it onto the card with some foam pads slightly off the edge but filling the circle neatly.

So considering I only had 2 products to take part in this challenge I don't think I did too badly! 

hugs

jo
xx


Saturday, 13 August 2011

Pick a page at random

So the SSSC was to pick a Tim technique - how on earth do you just pick a Tim technique???  Well the easiest for me was to randomly open Compendium and see what page I landed on and that would be my technique. I didn't like the page I landed on, so I then had a flick through and ended up on shabby chic!

So in the perpetual battle of using up stash  found an old IKEA square picture frame, covered in some REALLY OLD Basic Grey paper. Picket fence over that and then weathered wood and burlap stains over that.

For the technique bit I used some raw umber on the grunge paper, stamped with an old floral swirly wooden stamp and embossed.  Had a bit of a nightmare with the embossing because I sprinkled pearl powder not clear at first, panicked and quickly wiped off.  Fortunately there was still enough stickiness to cope with clear embossing powder.  

Then to think about the top layer of paint.  I started off with a dark blue but it was just too dark and wasn't giving enough contrast, so then found a paler baby blue left it on a bit longer and then wiped off - success!

Happy so far but now what?
Work and stuff got in the way so I returned to my work desk on Thursday night as I had to make my mum a birthday card.  I cut out a PaperArtsy heart  from a scrap of Lost and Found, inked the edges and then spread rock candy stickles to give a bit of subtle bling. Put the heart on top of a bit more scrap Lost and Found and attached to the background I'd made from embossed and inked handmade paper.  Looked at it and thought - nope, it doesn't work and I don't like it (ended up BUYING my mother a card - I know, shame on me).

So this morning knowing I had to finish this off to meet deadlines I looked at the carnage on my work desk and thought ... use the heart embellishment on the shabby chic background - two techniques!

Pictures aren't great (sorry), no light outside so forced indoors with flash and lamps!

Anyway a relatively short post today as I'm off to the NEC in Birmingham for the Quilt Festival (birthday treat for mum). I PROMISE not to spend, especially as I haven't used the fabric I got last year, but if I see any nice lace trim I might just have to break open the piggy bank ....
hugs

jo
xx


Thursday, 11 August 2011

I wish ...

So the Sunday Stamper challenge was wish.  Um don't think I'm really brave enough to tell you what is on my wish list, those secrets stay deeply locked in my heart (and some would say they might be regrets, but I try not to have too many of those as they can send me into a right blue funk of depression), but I could say the standard response which is of course to win the lottery (the euro lottery naturally) and world peace.

Anyway deep dark wishes aside, this is my entry for the challenge this week.I'm trying to be good and use up stuff that I've got rather than buying new stuff and when I means stuff of course I mean paper and canvases not ink, stains, paint or stamps (honestly what do you take me for - they are ESSENTIAL).  

So this is a 10x8" canvas that I've had for ages and I put loads of white acrylic on and then added weathered wood and bundles sage distress stains on and then added the same inks to get a bit more depth.  Some text added in peeled paint and denim.

I then used a piece of 12x12 green card stock painted over it in an apple green lightened with white, cut into 4 and ran through my big shot with the tattered florals die.  Stuck them together with the glue gun to give some height and added a green candy from Craftworks Cards in the centre. Sprayed loads of marshmallow, lime twist, iridescent gold glimmer mists (see using up stash) and edged with peeled paint distress ink and finally some vanilla breeze glimmer mist as well.

I had a brainwave whilst driving to work (this often happens, I also have them in the shower as well) the next morning what if I edged the canvas with strips of metal embossed and scooched (copyright Lin Brown) the edges?  As you can see it worked a treat.  I put grey paint over the top and wiped off the excess to aged and dull down the green, cut into 1" strips and then into smaller pieces, schooched the edges, sanded to expose the aluminum and stuck down with red tape.

Finally stained some card with picket fence and brushed corduroy distress stain and stamped wish with an old Banana Frog alphabet set and stuck everything down with my trusty glue gun.

Photo's aren't fantastic as the light is appalling this evening but you get the idea!  Right off to tidy up craft room and make a birthday card for my ma for tomorrow and this about other challenges!

hugs
jo
xx