Sunday 29 April 2012

Testing, testing ...

So I finally did it and went and purchased an iPad. So far yep I like it and John tells me it keeps me quiet ( um).

Work in progress on my desk including the back end of the cat (not a work in progress).

Hugs

Jo

Saturday 14 April 2012

Blue Numbers

Considering I've had a week off, tell me why has it taken me till Saturday to make and submit my entry for Hels Sunday Stamper Challenge?  As ever last minute Nellie that's me!

So the theme was numbers to celebrate 200 challenges, I pulled out all my stuff in relation to numbers and selected some blue card (well I say selected, really it was a sheet of 12x12 lying on the sofa in the craft room that I just happened to pick up rather than go through the stash).


Cut the 12x12 down to 8x8 and used the off cuts to cut the tags and the embossed background.  I used South Pacific Fresco Finish paint all over and then stencilled in Pea Coat and went over the top bumping a bit to give the shadow in Ice Blue. Plus a bit of sequin waste with Pea Coat as well.

The embossed oblong was first painted in a mixture of Baltic Blue and Ice Blue, embossed and then sanded a bit heavier over the large numbers which were then inked with Walnut Stain Distress Ink.  the edges were more roughly dome to expose the pale blue of the card.

The clock is grunge paper inked in Baltic Blue and then Weathered Wood Distress Embossing powder added, not all over to add to the distressed look.
 
The large tag was painted in South Pacific and then Baltic Blue dry brushed over and then it was sanded as well. The PaperArtsy number stamp was stamped in white ink.  Edges roughed up and Walnut Stain Distress Ink added.

The small tag was painted in Ice Blue and South Pacific, sanded and Pea Coat stencilled over that.  A sanding to flatten the paint ands remove some of it and the Tim Holtz quotation added in black and embossed.  Some Prima flowers and Craftworks Card Candi added in the centres. You can also see some silvery blue Stickles on them as well.  This was an experiment for the centres but it didn't really work so I painted some white Candi blue to match the flowers but there were still bits of Stickles around.  In hindsight I'd rather have just gone with the Candi but they sort of match the silvery pale blue ribbon at the top, so reasonably happy.

So a big thank you to Hels for organising this challenge week in, week out and I don't always get to play but when I do it's great to stretch your imagination within the limits of the theme.

hugs

jo
xx

Friday 13 April 2012

Shabby Wreath

Sometimes a stayvacation (not going away) is really good.  This week I've pottered around at home finishing of projects in my craft room, tidying it up and throwing stuff away that I know I'm never going to use. It was quite therapeutic.

I really do hate clutter, seeing it, surrounded by it clutters my brain and weighs me down and I have difficulty doing anything as I attempt to wade physically and mentally through piles of stuff. Don't get me wrong the house doesn't have to be super neat (house work really is a chore and is endured for the minimum amount of time, there are much better ways to spend my free time), lived in is fine as long as once you've finished with it put it away.

So this was once of those projects that had been half started and then left lying in my craft room since Christmas and yesterday it got finished.

I tool a wire coat hanger and wrapped some quilt batting around it and then covered in strips of calico.  to be honest the quilt batting isn't necessary but I had some odd bits hanging around (see use it up or throw it away).

Next I took some old fabric in this case some pillow cases from a charity shop purchase and ripped them into strips (I love the sound of ripping fabric such a sharp purposeful noise), then cut these into approx 4" strips.  Each strip was tied in a knot around the wrapped coat hanger until it was full. 

A bit of fluffing and ruffling to make sure the ends weren't all in straight lines and a shabby wreath is created!  I might add in some wisps of ribbon here and there to break up the white a bit but I ain't rushing to do that, I 'll just look at it for a couple of days and see whether it really needs it.

It's hanging on the craft room door facing onto the landing, so far husband either hasn't seen it or has decided not to comment! 

These pictures were taken half an hour ago outside in the damp sunshine in amongst the plum blossom and now the fog is rolling in - Spring eh!

Right I'm venturing out today to see the lovely Gabrielle for cake, coffee and a good ole chat!

hugs

jo
xx

Wednesday 11 April 2012

WOYWW 149

Just a quickie this morning for the weekly snoop around the crafting world engineered by Julia

As you can see not much on the desk apart from the sewing machine and some fabric. Yesterday and today is all about patchwork! I had these strips of fabric for ages, first in a box and then after they'd been sewn into strips on my noticeboard.  This week I am finally going to make them into a scrappy shabby quilt top. I might even be daring and go and get batting on Friday from my friendly quilt shop otherwise it will get folded up and put in a box for another couple of months!

Mind you the sun is shining so I might be tempted outside for a spot of gardening or possibly snoozing ....

hugs

jo
xx

EDITED: and here's the completed quilt top. I laid it out on the bed to measure it up, when I got back from getting the tape measure, look what I found on it looking cute!

Tuesday 10 April 2012

50's retro

My husband won't be a happy bunny this week as he's at work and I'm off (we have different leave years so I'm using up some of my allocation) and of course at this precise moment in time it is sunny after a particularly wet (good) and cold (bad) Easter weekend. 

Yesterday in our house was a sewing / sowing day, husband in the green house (it's very The Good Life in our house sometimes, not quite sure I have Felicity Kendall's bottom though) sowing  seeds for the veg garden and me in the craft room sewing random bits of fabric to paper.

I like my 8x8 pages but sometimes I just want to go BIG and create something on a larger scale that I can put in a large frame.  I have a lot of wall space in my bedroom and I'm slowly filling it with art like this. 
 
The previous evening I'd been playing with some of my photographs adding finishes, textures and changing the colour, saturation etc.  I printed this one of a very faded red rose we had in the garden last year.  

I attacked it with some sandpaper to remove some of the colour, reveal some of the other colours used in printing and generally roughed it up a bit. I loved how it really made the colours change and it started to look like a hand tinted photo from the 50's that had aged and cracked a bit.  I then added a thickish layer of Rock Candy Crackle and left it to dry overnight.  

Monday morning in the rainy gloom, I  splodged some Rose Fresco Finish paint over an A3 piece of paper, using a sponge and a wet wipe.  I then stamped a large damask stamp with Maroon Archival randomly over the page to look like old faded wallpaper. 

Pulled out some scraps of fabric and started sewing them on, layering up here and there with loads of very wonky stitching!  Took some Hyde Park Fresco Finish and put a tiny amount in a mister bottle and added some water.  Shook it up to mix and they spritzed it randomly over the page especially round the edges.  Once that was dry I gessoed over the top with a roller to tone it all down.

Whilst that was drying I turned to the photo, it was looking good with that crackle on top.  Added some Fresco Finish in Beach Hut (I know it sounds weird, but it just needed some blue in amongst that green and red)  and sewed it onto some rough calico.

I started to add more layers to the background A3, first some paper strips vertically and then some corrugated card horizontally.  Finally a strip of fabric with orange, red and green in it with a riped strand of green cotton attached with some pearlised peacock blue thread (lots of stitching).  The photo was added on top. 

This A3 was then scuffed up at the edges, some walnut stain added and put on top a bigger piece of cream card that had some gesso on it and Old Paper Distress Ink added (straight to paper technique).

And this is it in all it's finished glory - just need to hang it on the wall now!

 
 hugs

jo
xx

Friday 6 April 2012

A REAL shabby dandelion

I think I'm beginning to identify my signature style - layers, made up of fabric and paper with stitching stamping and a focal point.  Sometimes that focal point is a strong stamped image sometimes as in this case it is one of my photographs.

I rarely take photos of people, don't like that forced stand in a regimented group, smile and record the event kind of thing.  Very often I'll use a long lens and take a close up without people even realising I'm taking a photo - far more intimate and more natural (no I don't work for a red top comic).

But my greatest love with photography is close ups of flowers (and stone walls and moss and wood and rusted metal if I'm honest). Before the days of digital cameras I would go through rolls and rolls of film on holiday or day trips to National Trust gardens and my poor husband would become a photographers assistant as I changed film or lenses.

With my photographs sometimes I don't want a clear image, sometimes I want it all aged or faded or roughed up (there's that style thing again), that's why I love Instagram as it has all those delicious filters you can lay over an image.  In this case I did some image transfer using gel medium.  I printed my photos on ordinary white paper and photocopied them.  Spread a thickish layer of gel medium on card and put the image face down on that and made sure it was well adhered.  Let it dry (overnight is best), wet the image and gently rub off the photocopy paper and you get a roughed up image because the image doesn't stick all over and you get odd bits of white space. Love it.

You can of course use black and white images like I did here or colour ones.  But in both you can further colour as you have paper as the base layer not glossy photo paper.  For this one I used Peeled Paint and Broken China Distress Inks over the top - literally just rubbed the ink pad over the image and used a baby wipe just to move it around a bit and soften the edges.

The 8x8 base layer had Peeled Paint and Shabby Shutters Distress Ink with Lettuce ColourWash added.  The stamping using PaperArtsy stamps was done in Aquamarine Archival (love this teal blue colour) 

Once the fabric strips were sewn on I went over them with gesso (rolled on so it wasn't too heavy)  to tone down the brightness. Rubbed back the gesso with a baby wipe where it had gone over the stamped images.  

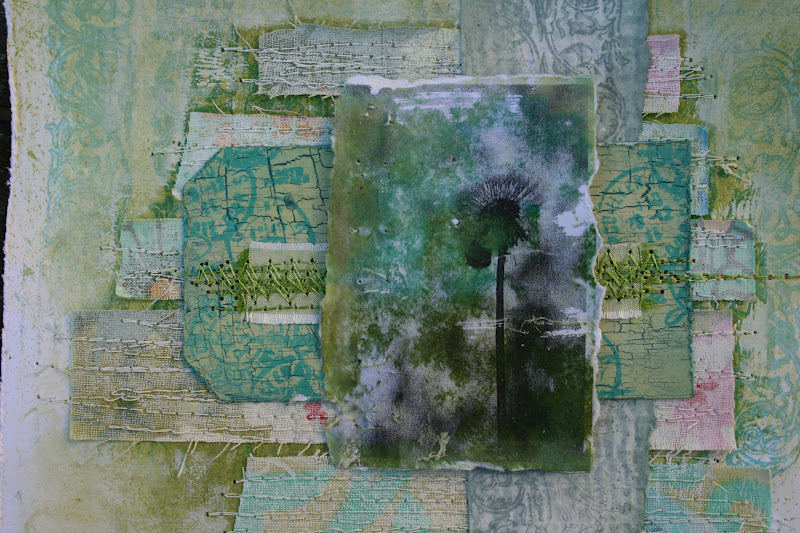
The scrap of card was inked with Weathered Wood Distress Stain, embossed using a  brick effect folder and then White Picket Fence Distress Stain over that.  Stamped in  Iced Spruce Distress Ink, torn edge and inked with Iced Spruce as well.

The tag was painted in Baltic Blue Fresco Finish, a layer of PaperArtsy Crackle Glaze and then a mixture of Inky Pool and Guacamole Fresco Finish over that. Stamped in Broken china and Aquamarine.  A strip of lime green silk and some metallic line green thread stitching to anchor it all both physically and visually. 

I like it and it makes me happy to make and look at, but the question is would other people like and more importantly do you think they would spend money on buying something like this???? I ask because what I'd really like to do is make art with my photographs and sell on Etsy.  That would be  big step for me in terms of confidence but doing this blog has helped me  "get out there" and feel more confident in my abilities creatively.

Right enough of the self analysis and time for a fortifying breakfast, it is Good Friday which means in our house - tidying the veg patch ready for planting!

hugs

jo
xx


Tuesday 3 April 2012

Works outing

I kid you not this has taken me over two weeks to finish, it was supposed to be an entry in a challenge (Sunday Stamper - misting) but "missed" the deadline!

8x8 blue card stock with some Beach Hut Fresco Finish painted then sprayed in various green inks including some shimmery ones.  On the right had edge I sprayed some blue inks but they were just too heavy, so rummaged in the fibres box and found some white and blue silk weavers waste so sewed that on with some blue/ green shimmery ribbon.  

The bottles from this PaperArtsy plate were repeatedly stamped using Aquamarine Archival.

The tag was painted in Ice Blue and Beach Hut Fresco Finish paint and the circles were added using denim colourwash spray. Our esteemed  gentleman from this PaperArtsy plate were stamped in Ultramarine Archival. edges distressed and Walnut ink round the edges.

That's how it stayed until this morning when I added the felt, green ribbon and buttons  and added some splodges of Bundled Sage Distress Stain.

So why works outing as a title?  

Well I went out on a sort of works outing on Friday night ( a rugby do) with a lot of smartly dressed gentlemen and the number of bottles on our table at the end of the evening sort of matched the background to this.  Needless to say I could have also called it "Never Again" if you get my drift or the "East Maudsley Temperance Society Annual Outing"

hugs
jo
xx

Sunday 1 April 2012

Tag update

I loved the tag I made for the Simon Says Stamp and Show, but it just needed a "little bit more"

So here it is with a little bit more, by which I mean fabric and ribbon and fibres and threads and paint and buttons.

8x8" background painted in Fresco Finish in Sherbet and Dolly Mix, the stencilling done in Orchid with a smidge of Walnut Distress Stain to make it "dirty"

Pink fabric brown velvet and ric rac ribbon and of course some silk throwers waste. 

I know, I know, I just can't leave it alone can I, but it does look good doesn't it!

hugs
jo
xx